Overview
This page provides step-by-step directions for adding an image, a heading, and some text to a page. The steps are very similar for adding any other content item to a page.
In these steps, the content items are added to the Main Page. The steps are the same for any other page, as explained in step 3.
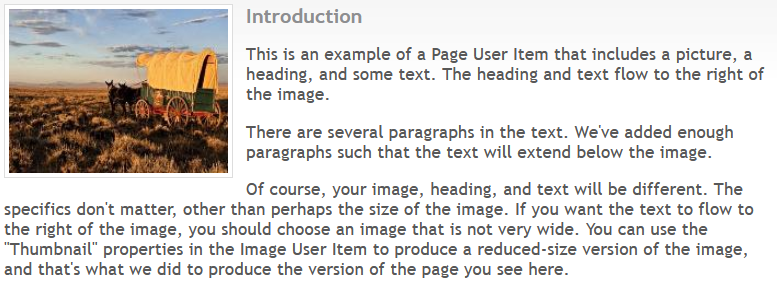
We'll add an image, a heading, and some text. We want the image on the left, and the heading and text to flow to the right of the image.
Steps
Start with GedSite running and your .gsfile open.
-
Go to the User Items section by clicking User Items in the list on the left-hand side of the main GedSite window.
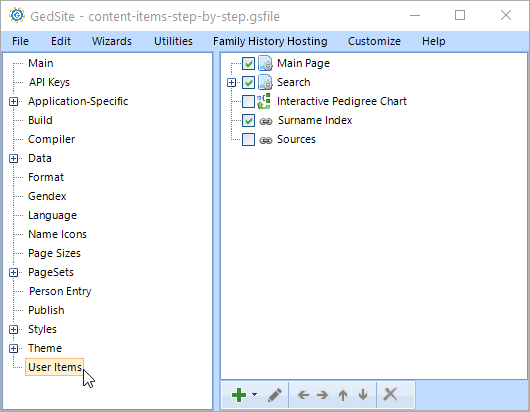
User Item Section -
Click the Main Page item once to select it.
Do not double-click the item; that will open a new window to edit the item. Click only once on the item to select it.
In these instructions, we are modifying the Main Page. To modify some other page, click once on the desired page to select it, rather than clicking the Main Page item.

User Items Section after clicking the Main Page to select it. -
Click the [+] button beneath the list. That will reveal a long list of items you can add to your site.

The [+] button submenu. -
Click the Image item in the submenu. That will open the Add Image Item window.

The Add Image Item window. -
Click on the Title textbox and key a title.
The title is for your use only. The title identifies the Image User Item in the list of User Items. It does not appear on the page.

The title we keyed. -
Click on the [Image...] button. This will open a standard Open file dialog window.
-
Navigate to the folder that contains the image you want to add to the page. Click the desired image file, then click the [Open] button.

The Open file dialog window. -
GedSite will open the image and add it to the Add Image Item window.

The Add Image Item window showing the image we selected. -
If we saved the Image User Item at this point, then made the site, the image would be larger than what we want. We'll use the Thumbnail sub-section of the Image User Item to reduce the size of the image.
-
Click Thumbnail in the list of sub-sections on the left of the Add Image Item window.
-
Change the Option pull-down menu from "None" to "Thumbnail".

Changing the Thumbnail Option. -
The default thumbnail size is 200px wide by 200px tall. GedSite will adjust the actual dimensions to maintain the aspect ratio of the original image. If you want a different size, adjust the Width and Height properties.

Thumbnail option with default Width and Height. -
Click Image in the list of sub-sections on the left of the Add Image Item window to return to the Image sub-section.
-
By default, the Use Lightbox checkbox will be checked. You can read about the Lightbox feature to learn more about it. For this example, we'll turn it off. Uncheck the Use Lightbox checkbox.
Use Lightbox is unchecked. -
You may want a caption, or you may want the image to be a link where clicking the image navigates to a different page. You can control such things by further edits to the Image User Item. You can read about those on the Image User Item help page.
-
Click [OK] in the Add Image Item window to close the window and save the item.
GedSite will return to the User Items Section and the Main Page will now have a child item.

User Item Section with wagon image item under Main Page item.
If you stop here and make the site, the Main Page would include an image. Let's continue and add a Heading and some paragraphs of text.
-
Click the Main Page item once to select it.
Do not double-click the item; that will open a new window to edit the item. Click only once on the item to select it.
In these instructions, we are adding items on the Main Page. To modify some other page, click once on the desired page to select it, rather than clicking the Main Page item.
-
Click the [+] button beneath the list. That will reveal a long list of items you can add to your site.
-
Click the Heading item in the submenu. That will open the Add Heading Item window.

The Add Heading Item window. -
Click on the Heading textbox and key the heading text.
The heading identifies the Heading User Item in the list of User Items, and the heading text will appear on the page after you make the site.

The Add Heading Item window after keying the Heading text. -
Click on the Text textbox.
From here you have two choices. You can either (1) key the HTML text you want using the Text Editor, keying HTML tags, etc., or (2) you can use the HTML Editor. Please read one or both of those help pages to decide which you want to use and how to use it.
You may leave the text empty, and that will create a heading only. If you key any text, that will create both and heading and the text that follows it. Here's how the Add Heading Item window appears after adding some text.

The Add Heading Item window after adding text. -
Click [OK] in the Add Heading Item window to close the window and save the item.
GedSite will return to the User Items Section and the Main Page will now have two child items.

User Item Section with multiple child items under the Main Page item. -
Choose File > Save from the GedSite menu or key [Ctrl+S] to save the .gsfile file.
We've made a few changes and it's a good idea to save your work periodically when making changes.
-
Choose File > Make Site from the GedSite menu or key [Ctrl+M] to make the site.
-
Choose File > Browse Site from the GedSite menu or key [Ctrl+B] to open the site.